I started this challenge as part of my training after completing last month's Azure Resume challenge.
This one was particularly challenging for me because I had no such experience in Python when starting the project. I learnt on the go with a lot of resources from stack overflow and AWS docs.
The goal of this challenge is to automate an ETL processing pipeline for COVID-19 data using Python and cloud services (AWS here).
You can find the steps for this #CloudGuruChallenge here.
Let's begin!
The first part of this challenge is all about importing and manipulating data from 2 csv files and importing selected data to a DynamoDB Table.
After a lot of googling, I decided to use pandas dataframes to store the csv data and perfom the required transformation (conversion of the date field in a date object, joining data from 2 dataframes, removing non-US data...).
The csv import and data transformation were handled separately by 2 different modules.
import ssl
import pandas
ssl._create_default_https_context = ssl._create_unverified_context
def usdata():
uscovid19 = []
csvurl = 'https://raw.githubusercontent.com/nytimes/covid-19-data/master/us.csv'
uscovid19 = pandas.read_csv(csvurl, delimiter=',')
return uscovid19
def recovered():
recovered = []
recurl = 'https://raw.githubusercontent.com/datasets/covid-19/master/data/time-series-19-covid-combined.csv'
recovered = pandas.read_csv(recurl, delimiter=',', usecols=[0,1,4])
recovered = recovered[recovered['Country/Region'] == 'US']
recovered = recovered.drop('Country/Region', axis = 'columns')
return recovered
import import_csv
import pandas

def main():
    try:
        uscovid19 = import_csv.usdata()
        recovered = import_csv.recovered()

        uscovid19['date'] = pandas.to_datetime(uscovid19['date'])
        recovered['Date'] = pandas.to_datetime(recovered['Date'])

        alldata = pandas.merge(uscovid19, recovered, left_on='date', right_on='Date')
        alldata = alldata.drop('Date', axis='columns')

        return alldata
    except Exception as er:
        print(er)
The data transformation module calls import_csv and returns the combined csv data as a pandas.dataframe
Load data into DynamoDB
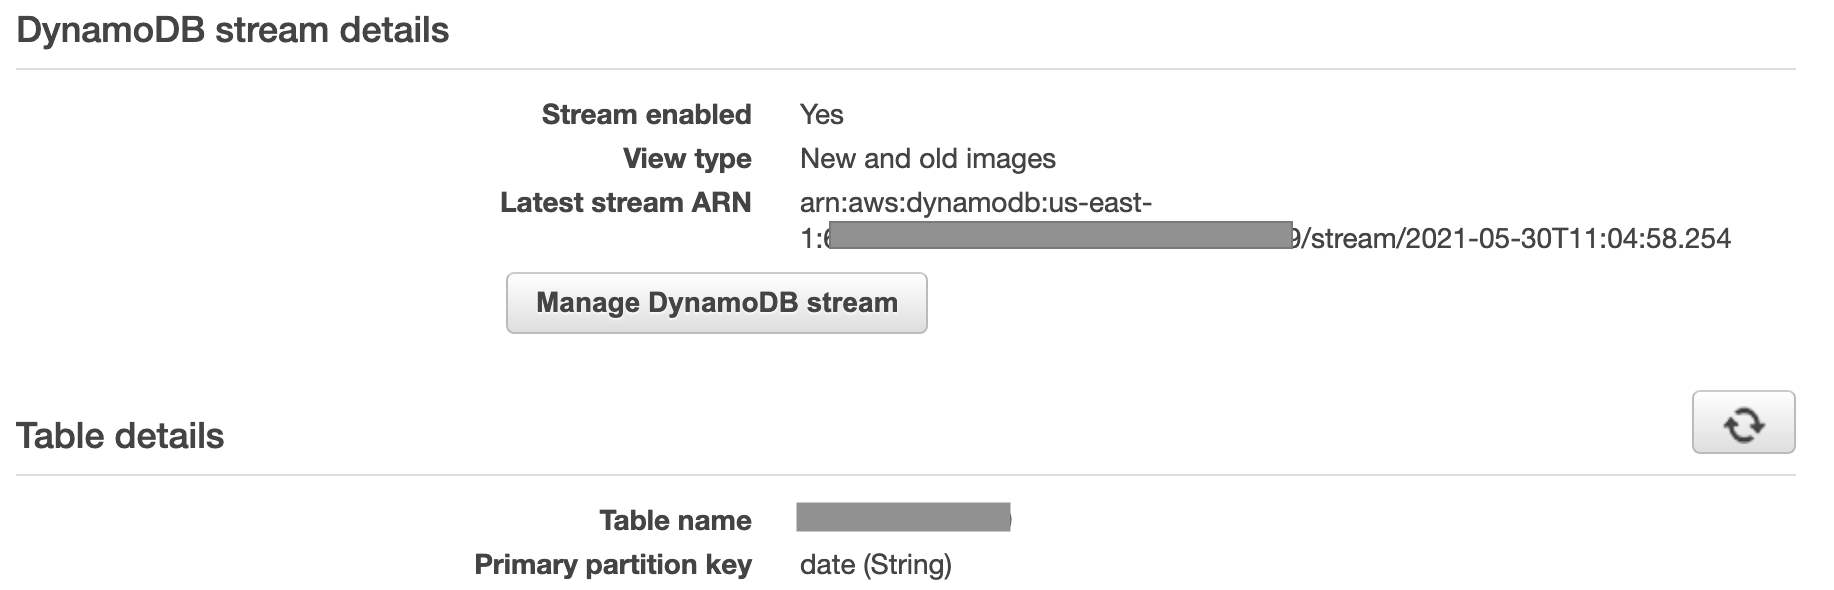
First I created a DynamoDB table with date (String) as the partition key and enabled DynamoDB Streams.
Since this code will be triggered by a CloudWatch Rule, the data load process has to be conditional depending on the count of items in the table compared to the count of items in the dataframe.
- Initial data load (no items in DynamoDB table)
I got the count of items by scanning the table dynamotable.scan(Select = 'COUNT')['Count'].
When the count returns 0, the code bellow is triggered:
def initial_load(dataframe, dynamotable):
    try:
        datacount = int(len(dataframe.index))
        for row in range(0, datacount):
            date = str(dataframe.loc[row, 'date'])
            cases = str(dataframe.loc[row, 'cases'])
            deaths = str(dataframe.loc[row, 'deaths'])
            Recovered = str(dataframe.loc[row, 'Recovered'])
            dynamotable.put_item(
                Item={
                    'date': date,
                    'cases': cases,
                    'deaths': deaths,
                    'Recovered': Recovered
                }
            )
        print ('First load of Items completed successfully')
        finalcount = dynamotable.scan(Select = 'COUNT')['Count']
        response = finalcount
        return response
    except Exception as er:
        print(er)
- Appending the table with new items
When the count of items in the dataframe is greater than the count of items in the table, the code bellow is triggered to add only new items (new days).
This code is not complete for me, as it only add new items after the last item in the table. No control has been implemented to check and add new items at any other row than the last one.
def append_data(dataframe, dynamotable):
    try:
        dynamocount = int(dynamotable.scan(Select = 'COUNT')['Count'])
        datacount = int(len(dataframe.index))
        for row in range(dynamocount, datacount):
            date = str(dataframe.loc[row, 'date'])
            cases = str(dataframe.loc[row, 'cases'])
            deaths = str(dataframe.loc[row, 'deaths'])
            Recovered = str(dataframe.loc[row, 'Recovered'])
            dynamotable.put_item(
                    Item={
                        'date': date,
                        'cases': cases,
                        'deaths': deaths,
                        'Recovered': Recovered
                    }
                )
        dynamotable.scan()
        print ('DynamoDB table updated successfully')
        finalcount = dynamotable.scan(Select = 'COUNT')['Count']
        response = finalcount - dynamocount
        return response
    except Exception as er:
        print(er)
Both codes return the number of added items to the table (just to be able to log it).
Below is the main code which calls the initial load or the append data modules based on the items count. I also added a part for no new items in dataframe vs table.
def load_data(dataframe, dynamotable):
    print('---------------------')
    print('Begining data Laod')
    print('---------------------')
    dynamocount = int(dynamotable.scan(Select = 'COUNT')['Count'])
    datacount = int(len(dataframe.index))
    count = datacount - dynamocount
    print('Items in DynamoDB table: ' + str(dynamocount))
    print('Items in dataframe: ' + str(datacount))
    if dynamocount == 0:
        print('Table first load of items')
        response = initial_load(dataframe, dynamotable)
        print( str(response) + ' ITEMS CREATED')
    elif dynamocount == datacount:
        print('NO NEW ITEMS')
    elif dynamocount != datacount:
        print('Appending table with new items')
        response = append_data(dataframe, dynamotable)
        print( str(response) + ' ITEMS ADDED')
    print('---------------------')
    print ('Data load completed!!')
    print('---------------------')
Those modules are part of the same package which has been deployed to AWS Lambda as a function. The handler calls the load_data module with the DynamoDB table and the dataframe as arguments.
Running the function in Lambda resulted in several errors due to missing numpy dependencies even-though pandas and numpy lib were added to the function package . Numpy is required when using pandas in Python. I eventually came this post with the required python deployment package to run pandas and numpy in AWS Lambda with python 3.6 runtime. I just had to add my modules and it worked just fine.
Since this function update the DynamoDB table, don't forget to set appropriate permission to the execution role.
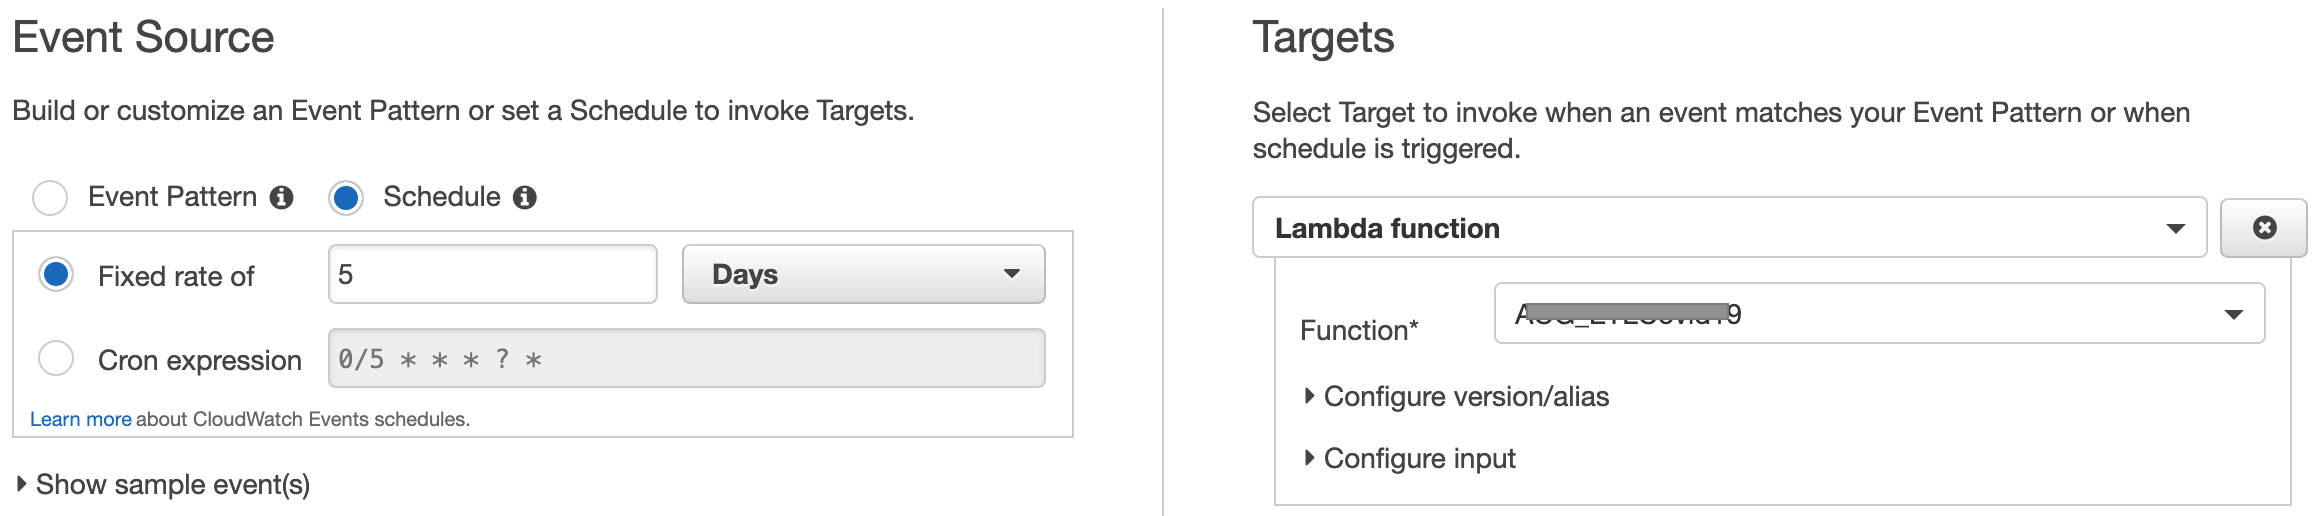
CloudWatch or EventBridge rule to trigger ETL function
Here I simply created a CloudWatch rule to trigger my function on a schedule. You will need to add a resource based policy to the function to allow lambda:InvokeFunction permission.
Notification
When the database has been updated, the code should trigger an SNS message to notify any interested consumers that the ETL job has completed. The message should include the number of rows updated in the database.
- Lambda function to publish message to SNS topic
I created another function triggered by DynamoDB streams with below configuration:
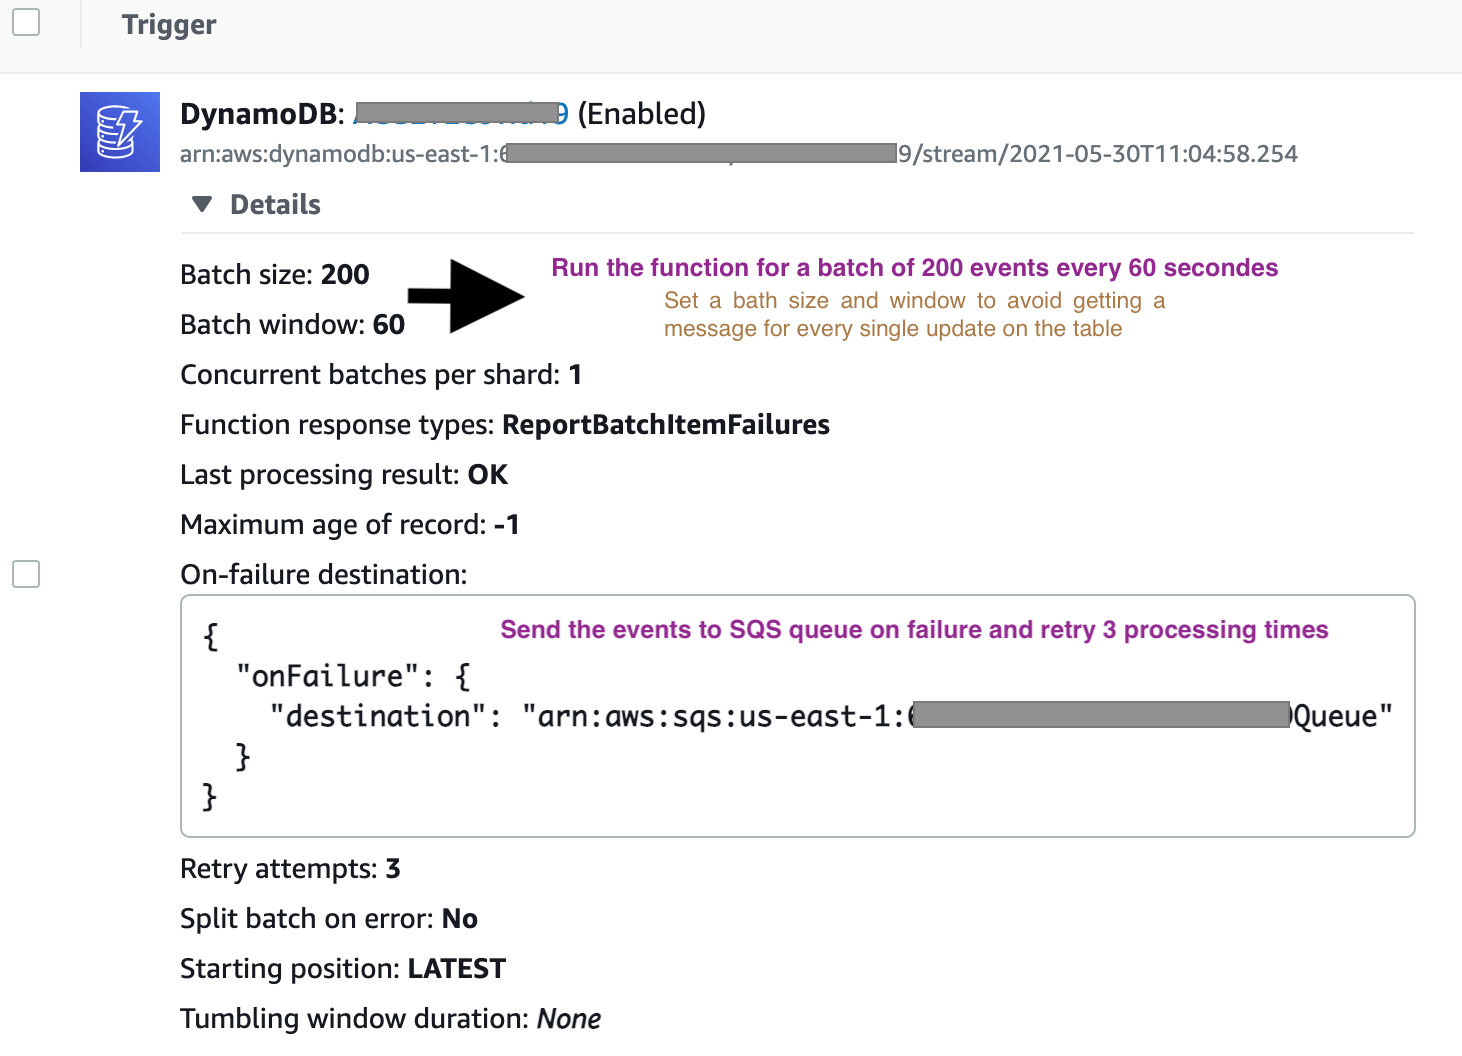
The code run through the events (DynamoDB stream) and get the total number of items added or deleted based on event name and then publish a message to SNS topic.
def get_stream_insert(event, context):
    try:
        new_rows_count = 0
        for record in event ['Records']:
            if record['eventName'] == 'INSERT':
                new_rows_count += 1
        return new_rows_count
    except Exception as er:
        print(er)

def get_stream_remove(event, context):
    try:
        del_rows_count = 0
        for record in event ['Records']:
            if record['eventName'] == 'REMOVE':
                del_rows_count += 1
        return del_rows_count
    except Exception as er:
        print(er)

def main(event, context):
    try:
        sns = boto3.resource('sns')
        topic = sns.Topic('arn:aws:sns:us-east-1:XXXXXXX:xxxxxxx')
        newItems = str(get_stream_insert(event, context))
        delItems = str(get_stream_remove(event, context))
        response = topic.publish(
            Message = 'The ETL job is completed. The table has ' + newItems + ' new items and ' + delItems + ' deleted items.' ,
            Subject = 'ETLCovid19 job status',
            MessageStructure = 'string'
        )
        print(str(response) + ' has been published!')
        return response
    except Exception as er:
        print(er)
        print('Couldnt publish message to SNS')
IaC
This part is about defining the created resources in code using CloudFront. I created a yaml template to import all the resources in a CloudFormation stack. Very useful guide on CF here.
Resources:
#Import S3 bucket
  ETLCovid19Bucket:
    Type: AWS::S3::Bucket
    DeletionPolicy: Retain
    Properties:
      BucketName: "BucketName"
      Tags:
        - Key: "xxxxxxxx"
          Value: "xxxxxxxx"

#Import DynamoDB Table to store data
  ETLCovid19Table:
    Type: AWS::DynamoDB::Table
    DeletionPolicy: Retain
    Properties:
      TableName: "TableName"
      BillingMode: PROVISIONED
      AttributeDefinitions:
        -
          AttributeName: "date"
          AttributeType: "S"
        -
          AttributeName: "cases"
          AttributeType: "S"
        -
          AttributeName: "deaths"
          AttributeType: "S"
        -
          AttributeName: "recovered"
          AttributeType: "S"
      KeySchema:
        - AttributeName: "date"
          KeyType: "HASH"
      ProvisionedThroughput:
        ReadCapacityUnits: 5
        WriteCapacityUnits: 5
      StreamSpecification:
        StreamViewType: NEW_AND_OLD_IMAGES
      Tags:
        - Key: "xxxxxxxx"
          Value: "xxxxxxxxxxx"

#Import ETLCovid19 Lambda Function
  ETLCovid19Function:
    DependsOn:
      - ETLCovid19Bucket
      - ETLCovid19Table
    Type: AWS::Lambda::Function
    DeletionPolicy: Retain
    Properties:
      FunctionName: "FunctionName"
      Handler: "ETLCovid19.main"
      Role: "arn:aws:iam::XXXXXXXXXXXXXX:role/service-role/xxxxxxxxx"
      Code:
        S3Bucket: "xxxxxxxxxxxxxx"
        ZipFile: "xxxxxx.zip"
      Runtime: "python3.6"
      Tags:
        - Key: "xxxxxxxxxx"
          Value: "xxxxxxxxxxx"

#Import ETLTriggerSNS Lambda Function
  ETLCovid19SNSFunction:
    DependsOn:
      - ETLCovid19Bucket
      - ETLCovid19Table
    Type: AWS::Lambda::Function
    DeletionPolicy: Retain
    Properties:
      FunctionName: "FunctionName"
      Handler: "trigger_sns.main"
      Role: "arn:aws:iam::XXXXXXXXXXXXXX:role/service-role/xxxxxxxxxxxxxxxx"
      Code:
        S3Bucket: "xxxxxxxxxx"
        ZipFile: "xxxxxxx.zip"
      Runtime: "python3.8"
      Tags:
        - Key: "xxxxxxxx"
          Value: "xxxxxxxxxxx"

#Import SNS Topic for notification
  ETLCovid19Topic:
    DependsOn:
     - ETLCovid19SNSFunction
    Type: AWS::SNS::Topic
    DeletionPolicy: Retain
    Properties:
      TopicName: "TopicName"
      Subscription:
        - Endpoint: "xxx@xxxxx.xx"
          Protocol: "email"
      Tags:
        - Key: "xxxxxxxxx"
          Value: "xxxxxxxxx"

#Import SQS queue for retries
  ETLCovid19Queue:
    DependsOn:
      - ETLCovid19Topic
    Type: AWS::SQS::Queue
    DeletionPolicy: Retain
    Properties:
      QueueName: "QueueName"
      VisibilityTimeout: 30
      Tags:
        - Key: "xxxxxxxx"
          Value: "xxxxxxxxxx"

#Import CloudWatch Rule
  ETLCovid19CloudWatchRule:
    DependsOn: ETLCovid19Function
    Type: AWS::Events::Rule
    DeletionPolicy: Retain
    Properties:
      Description: "Rule to trigger Function ACG_ETLCovid19"
      Name: "Name"
      ScheduleExpression: "rate(5 days)"
      State: ENABLED
      Targets:
        - Arn: "arn:aws:lambda:us-east-1:XXXXXXXXXXXX:function:xxxxxxxxxx"
          Id: "xxxxxxxxxxxx"
Here's a template view in the Designer
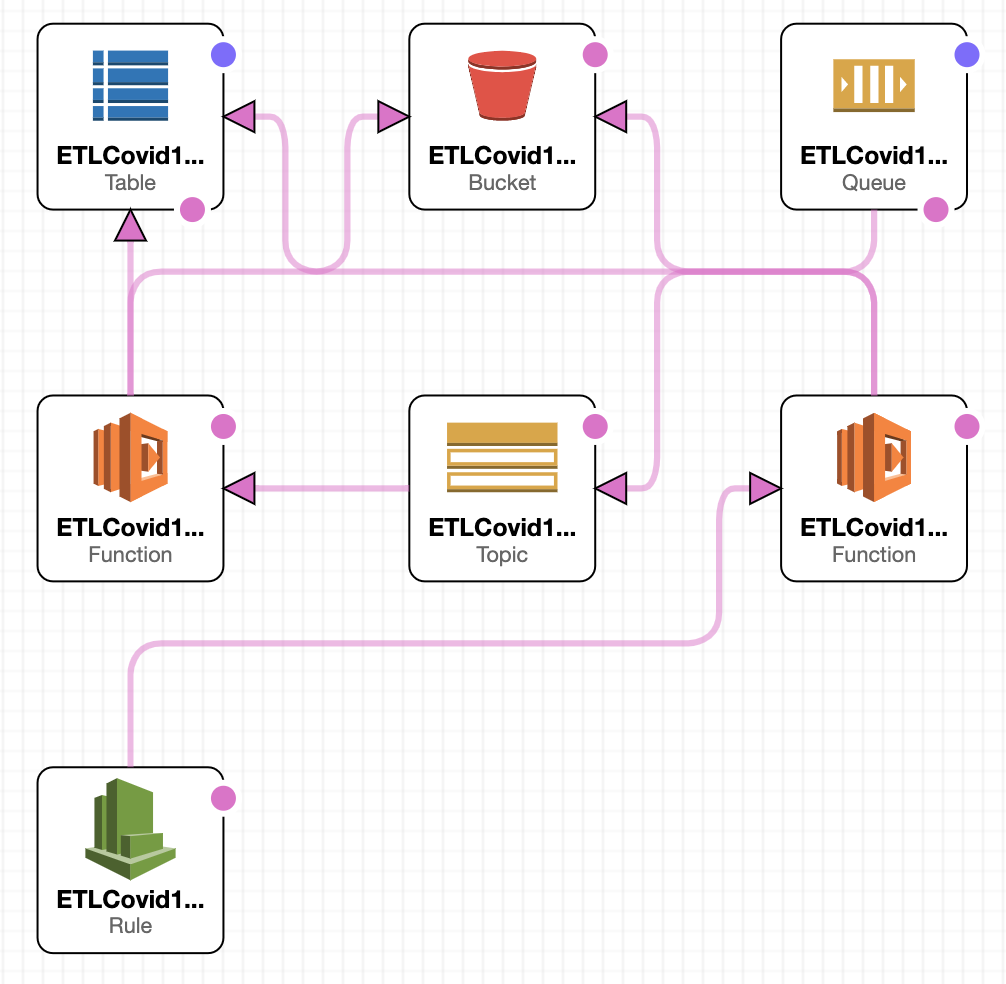
Imported resources

CI/CD
Deployed my functions to GitHub repository for change control and automatic deployment to AWS Lambda on test pass with GitHub actions. The repo structure is as below:
- Repository folder
  - backend
    - Function-1-folder
    - Function-2-folder
    - CloudFormation
Test files for each function are located in the function folder. Running python test using Nose2.
Below are the code for the workflows.
Paste the same code as above and modify as appropriate.
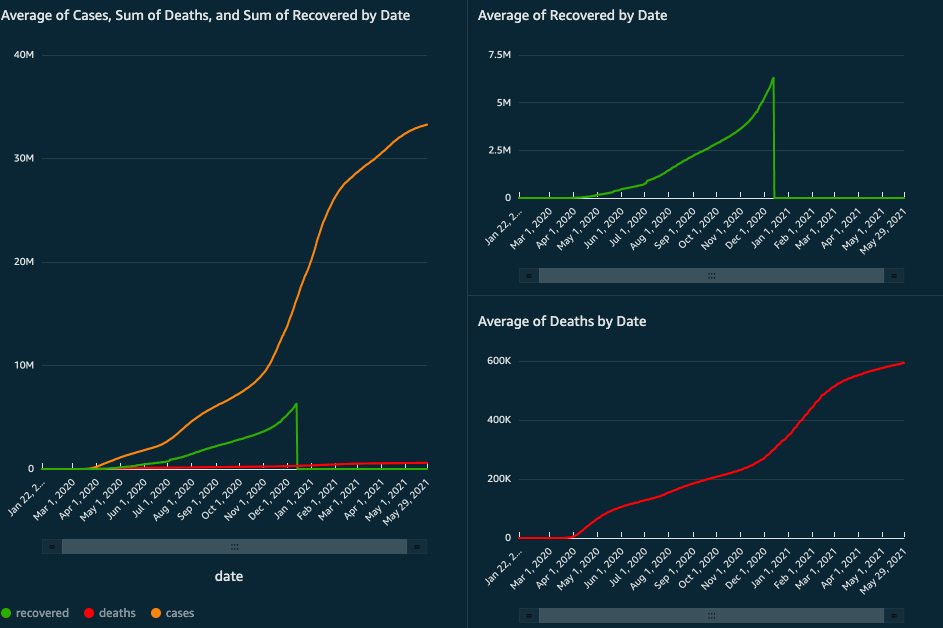
Results
Below is a dashboard created in QuickSight using the data in the DynamoDB table.
This article explains how to visualize DynamoDB data in QuickSight using Athena data connectors.